Real-Time Object Detection with Single Shot MultiBox Detector (SSD)

Real-Time Object Detection: Unveiling the Power of the Single Shot MultiBox Detector (SSD)
Imagine robots seamlessly navigating obstacles, self-driving cars recognizing pedestrians instantly, or medical imaging software pinpointing anomalies on the fly. These marvels rely on real-time object detection, and the Single Shot MultiBox Detector (SSD) stands as a leading force in this technology. So, grab your curiosity helmet and join us on a journey to demystify SSD!
1. Understanding SSD Architecture: Breaking Down the One-Shot Magic
Unlike its multi-stage predecessors, SSD boasts a unique "one-shot" approach. Here's the core idea:
- Single Pass, Multiple Predictions: SSD analyzes an image just once, extracting features at different scales simultaneously. Imagine looking at a scene through lenses of varying zoom levels, capturing various object details.
- Default Boxes and Predictions: For each location and scale, SSD employs pre-defined "default boxes" representing potential object sizes and shapes. It then predicts how much each box needs to be adjusted to accurately enclose the actual object. Think of these boxes as flexible molds that adapt to fit different objects.
- Confidence Scores and Localization: Finally, SSD assigns a "confidence score" to each prediction, indicating how certain it is about the object's presence and location. This helps distinguish real objects from false alarms.
2. From Ground Up: Deep Dive into the SSD Building Blocks
Now, let's dissect the key components that make SSD tick:
- The VGG Backbone: Imagine a powerful pre-trained image classifier like VGG as the foundation. SSD leverages its ability to extract rich features from various image regions.
- Multi-Scale Feature Maps: Instead of using a single feature map like traditional detectors, SSD generates multiple maps at different scales. This allows it to detect objects of diverse sizes, from tiny coins to towering buildings.
- Default Boxes and Prediction Layers: As mentioned earlier, these pre-defined boxes and dedicated layers play a crucial role in predicting object presence, location, and size.
- Non-Maximal Suppression: To avoid multiple detections for the same object, SSD employs this technique to select the most confident and unique bounding boxes.
3. Understanding Confidence Scores and Localization Boxes: Decoding the Predictions
So, how does SSD tell us what it "sees"?
- Confidence Scores: Each predicted bounding box comes with a score between 0 (uncertain) and 1 (highly confident). Scores above a certain threshold (e.g., 0.5) indicate objects with high detection confidence.
- Localization Boxes: These adjusted boxes mark the predicted location and size of the detected object. Imagine them as refined versions of the initial default boxes, precisely outlining the object's presence.
By combining these confidence scores and localization boxes, SSD delivers valuable information for real-time applications, making robots react to their surroundings, self-driving cars navigate safely, and medical software assist diagnosis.
Remember, this is just the beginning of our SSD exploration. Stay tuned for further adventures as we delve into real-world applications, implementation details, and comparisons with other object detection techniques. In the meantime, feel free to share your thoughts and questions about this fascinating technology!
Unveiling the Secrets of Real-Time Object Detection with SSD: From Theory to Practice
Remember that feeling of awe when a self-driving car effortlessly detects pedestrians or an app instantly identifies objects in your photos? Those seemingly magical feats rely on powerful object detection algorithms like the Single Shot MultiBox Detector (SSD). Today, we'll unveil the secrets behind SSD and empower you to implement it yourself!
Image Classification and Object Detection
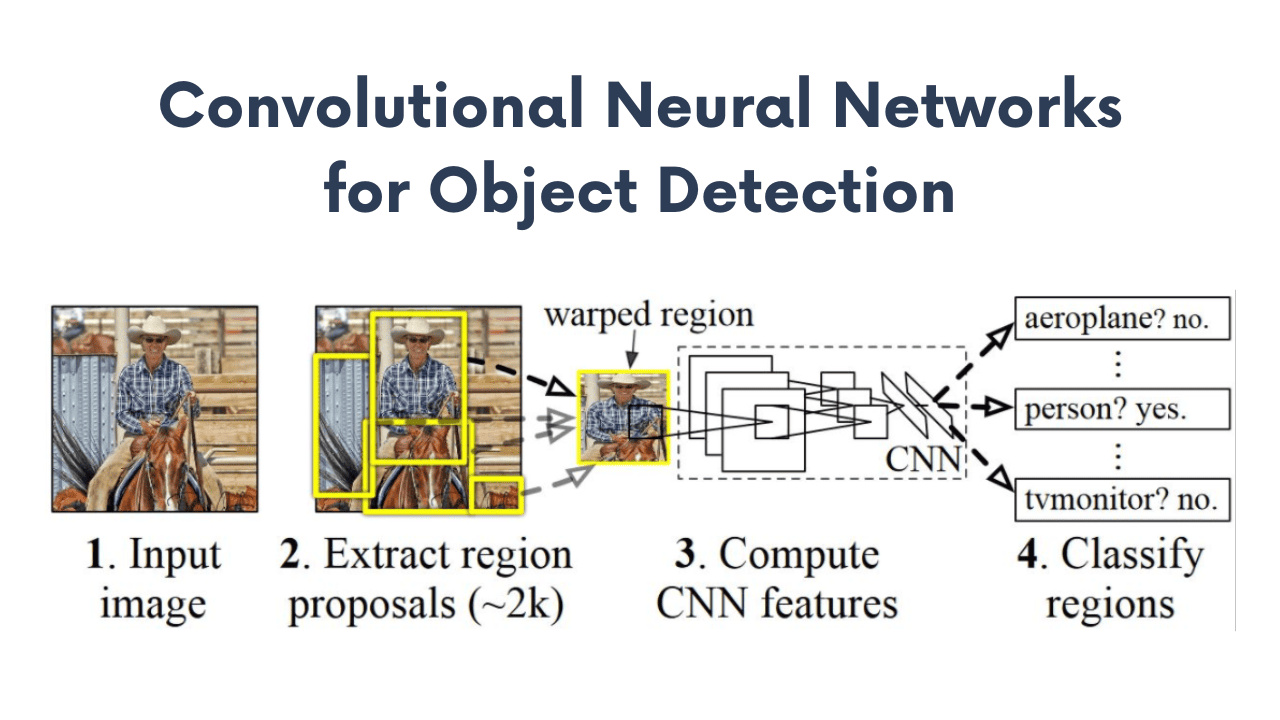
CNN’s are used for image classification and object detection. The difference between image classification and object detection is that the object detection is used to detect the position of objects in an image, without knowing what that object is. The image classification is what we know as image recognition where we put an object in a respective class. In order to optimize this process for image classification, first we need to search for objects and then localize those objects in an image using object detection. After that, we send those objects into another CNN to classify them. There are multiple architectures for object detection as Fast R-CNN, DeepID-Net, SSD, YOLO, HyperNet, RON(Reverse Connection with Objectness Prior Networks) The most common algorithms to detect objects on an image are YOLO, SSD and R-CNN.
Convolutional Neural Networks for Object Detection
R-CNN
R-CNN is a state-of-the-art visual object detection system that combines bottom-up region proposals with rich features computed by a convolutional neural network. e R-CNN uses region proposal methods to first generate potential bounding boxes in an image and then run a classifier on these proposed boxes.
Single Shot MultiBox Detector
SSD discretizes the output space of bounding boxes into a set of default boxes over different aspect ratios and scales per feature map location. At prediction time, the network generates scores for the presence of each object category in each default box and produces adjustments to the box to better match the object shape. Additionally, the network combines predictions from multiple feature maps with different resolutions to naturally handle objects of various sizes.
Building Real-Time Object Detection Systems with SSD:
we will see how can we perform Object Detection using SSD in the simplest way possible. SSDs are very fast in Object Detection when compared to those big boys like R-CNN or Fast R-CNN, etc.
This is going to be a very fun project with endless use cases. So without any further due, Let’s do it…
Gear Up for Speed: Building Real-Time Object Detection with SSD
Buckle up, tech enthusiasts, because we're about to delve into the thrilling world of real-time object detection! This blog will be your roadmap to building your own system using the powerful Single Shot MultiBox Detector (SSD) – a technology driving everything from self-driving cars to advanced robotics.
But why choose SSD? Unlike its predecessors, SSD can analyze an entire image in one go, making it perfect for lightning-fast detection. Imagine a security system spotting intruders instantly or a robot identifying objects on the fly – that's the magic of SSD!
Ready to unleash this power? We'll guide you through every step:
- Suit Up: We'll set up your development environment, ensuring you have the tools like Python and OpenCV at your disposal. Think of it as assembling your tech toolbox.
- Code Crafters, Assemble!: Dive into the code itself, line by line. We'll explain the core concepts of SSD and guide you through implementing it – no prior experience needed! Think of it as learning the secret language of object detection.
- Time to Detect!: Put your creation to the test! We'll run the system on real-world images and videos, witnessing its ability to pinpoint objects in real-time. Think of it as watching your code come to life, a true object detection superhero!
- Bonus Quest: Feeling adventurous? We'll offer additional challenges and resources to push your skills further. Explore fine-tuning the model for specific tasks, experiment with different objects, and unleash your inner AI master!
Remember, building an object detection system is an exciting journey. With each step, you'll gain valuable knowledge and practical skills in computer vision and AI. So, are you ready to join the quest for real-time object detection? Let's build something amazing together!
Create a conda environment and install the required libraries :
Code for Object Detection using SSD :
1. Gathering the Tools (Lines 1-5):
- Importing Libraries: We first import essential libraries like
imutils.videofor FPS measurement,numpyfor numerical operations,imutilsfor image resizing, andcv2(OpenCV) for computer vision tasks. Think of it as equipping your crafting table with the necessary tools.
- Importing Libraries: We first import essential libraries like
2. Setting the Scene (Lines 7-17):
- Defining Constants: We set up variables like
use_gputo enable GPU acceleration,live_videoto choose between live or recorded video, andconfidence_levelto filter detections. These act as adjustable knobs for fine-tuning the system. - Classes Array: We list the 21 classes that our SSD model is trained to detect, ranging from bicycles to cats to sofas. This is like giving our detector a visual dictionary to work with.
- COLORS Array: We create a vibrant palette of random colors to visually distinguish each detected class, making the results more eye-catching and informative.
- Defining Constants: We set up variables like
3. Loading the Object Detection Brain (Line 19):
- READING THE NETWORK: We load the pre-trained SSD model using
cv2.dnn.readNetFromCaffe. This model is the heart of our detector, containing the knowledge to identify objects in images.
- READING THE NETWORK: We load the pre-trained SSD model using
4. Empowering with GPU (Lines 21-24):
- GPU BOOST: If
use_gpuis set to True, we leverage the power of the GPU to accelerate processing. This is like giving our detector a turbo engine for faster object detection.
- GPU BOOST: If
5. Capturing the Visual Stream (Lines 27-31):
- VideoCapture: We initialize a
VideoCaptureobject to grab frames, either from a live webcam or a pre-recorded video file. This is like opening our detector's eyes to the visual world.
- VideoCapture: We initialize a
6. Analyzing Frame by Frame (Lines 34-61):
- READING FRAMES: We enter a loop to continuously read frames from the video stream. This is like our detector actively scanning its surroundings for objects.
- RESIZING FRAMES: Each frame is resized for consistency and efficiency.
- BLOB CREATION: We create a "blob" (a preprocessed image format optimized for the network) and feed it into the SSD model. This is like preparing a visual snack for our detector to analyze.
- DETECTING OBJECTS: The network analyzes the blob and outputs a list of detected objects with their confidence scores and bounding box coordinates.
- FILTERING CONFIDENT DETECTIONS: We only consider detections with confidence scores above the
confidence_levelthreshold. This ensures we focus on the most likely object sightings. - DRAWING BOUNDING BOXES: For each confident detection, we create a rectangle around the object in the original frame using the model's predicted coordinates. This visually highlights the detected objects.
- LABELING WITH CLASSES AND CONFIDENCE: We add informative text labels above each bounding box, indicating the detected class and its confidence score. This provides valuable context for understanding the results.
7. Unveiling the Results (Line 56):
- SHOWING THE FRAME: We display the final frame with all the detected objects, bounding boxes, and labels. This is where the magic of object detection comes to life!
8. Handling Exit (Lines 58-59):
- ESC KEY TO QUIT: We allow the user to exit the loop by pressing the ESC key, gracefully ending the object detection process.
9. Measuring Performance (Lines 61-66):
- FPS CALCULATION: We calculate and print the average frames per second (FPS) achieved by the system, providing a benchmark for its processing speed.
- PRINTING METRICS: We display the elapsed time and the final FPS metric, offering insights into the system's overall efficiency.
Result :
Got any questions about Object Detection? We're happy to help! Shoot us an email or connect on LinkedIn - we're always eager to chat about AI and road safety.
Secrets of Real-Time Object Detection with SSD
1. Understanding the Core: Demystifying SSD's Architecture
Imagine a detective simultaneously scanning a crowd for multiple suspects based on distinct descriptions. That's the essence of SSD! It analyzes an entire image in one go, unlike earlier methods that scanned piecemeal. Here's the breakdown:
- Single Shot: Processes the image **once**, predicting object locations and classifications simultaneously. Think of it as a detective making deductions based on a single observation.
- MultiBox: Employs various "boxes" of different sizes and aspect ratios to detect objects of varying scales, like the detective considering different heights and builds.
- Detector: Ultimately translates predictions into actionable results, pinpointing objects within the image. Now the detective identifies and apprehends the suspects!
By combining these elements, SSD achieves impressive real-time object detection while maintaining efficiency.
2. Implementing SSD with OpenCV: Hands-On Practice
Ready to roll up your sleeves and build your own object detector? Open-source libraries like OpenCV make it surprisingly accessible! Here's a step-by-step guide:
- 1. Choose a pre-trained model: Start with a pre-trained SSD model like MobileNet-SSD or VGG16-SSD, readily available online. It's like using a well-trained detective who already knows the suspect profiles.
- 2. Load the model and image: Use OpenCV functions to load both the pre-trained model and the image you want to analyze. Think of it as providing the detective with the suspect descriptions and the scene to investigate.
- 3. Perform inference: Run the image through the SSD model to get predictions for object locations and classes. Now, the detective analyzes the scene and identifies potential suspects.
- 4. Draw bounding boxes and visualize: Use OpenCV to draw bounding boxes around detected objects with their corresponding labels. Finally, the detective presents the identified suspects with clear visual evidence.
This is just a basic example, but it highlights the power and accessibility of implementing SSD with OpenCV. Remember, practice makes perfect, so experiment with different images and models to hone your skills!
3. Pre-Trained Models vs. Training Your Own: Choosing Your Weapon
Pre-trained models offer a quick and convenient starting point, but sometimes a custom-trained model is the answer. Consider these factors:
- Dataset availability: Do you have a large, labeled dataset specific to your needs? If not, pre-trained models might be better.
- Computational resources: Training a model from scratch requires significant processing power. Consider your hardware limitations.
- Customization needs: Do you need to detect unique objects not covered by pre-trained models? Then, training your own is the way to go.
Remember, choosing the right approach depends on your specific project requirements and resources.
4. Fine-Tuning for Specific Needs: Tailoring the Detective for Your Mission
Pre-trained models are versatile, but fine-tuning can further enhance their performance for your specific needs. Think of it as giving the detective additional information about the suspects' clothing, gait, or other specific details. Here's how:
- Transfer learning: Use the pre-trained model as a starting point and retrain its final layers on your custom dataset. This leverages the model's existing knowledge while adapting it to your specific objects.
- Data augmentation: Artificially expand your dataset by creating variations of existing images (flips, rotations), making the trained model more robust to real-world variations. It's like providing the detective with additional photos of the suspects from different angles and lighting conditions.
By fine-tuning, you unlock the full potential of SSD and achieve superior object detection accuracy for your specific use case.
Remember, the journey into the world of real-time object detection with SSD is an exciting one. Start with the basics, explore the practical implementation, and don't shy away from customization. With dedication and practice, you'll be building your own intelligent systems that see the world around them, just like that awe-inspiring self-driving car!
And that's a wrap on this blog, folks! We hope you found it informative and maybe even sparked a new interest in the world of computer vision. Remember, knowledge is power, and the power to detect helmets and plates just might save a life.