The HTML DOM (Document Object Model)
The HTML DOM (Document Object Model) is a programming interface that allows developers to manipulate the contents of an HTML document dynamically. It provides a way to access and interact with the HTML elements and their properties in a structured manner.
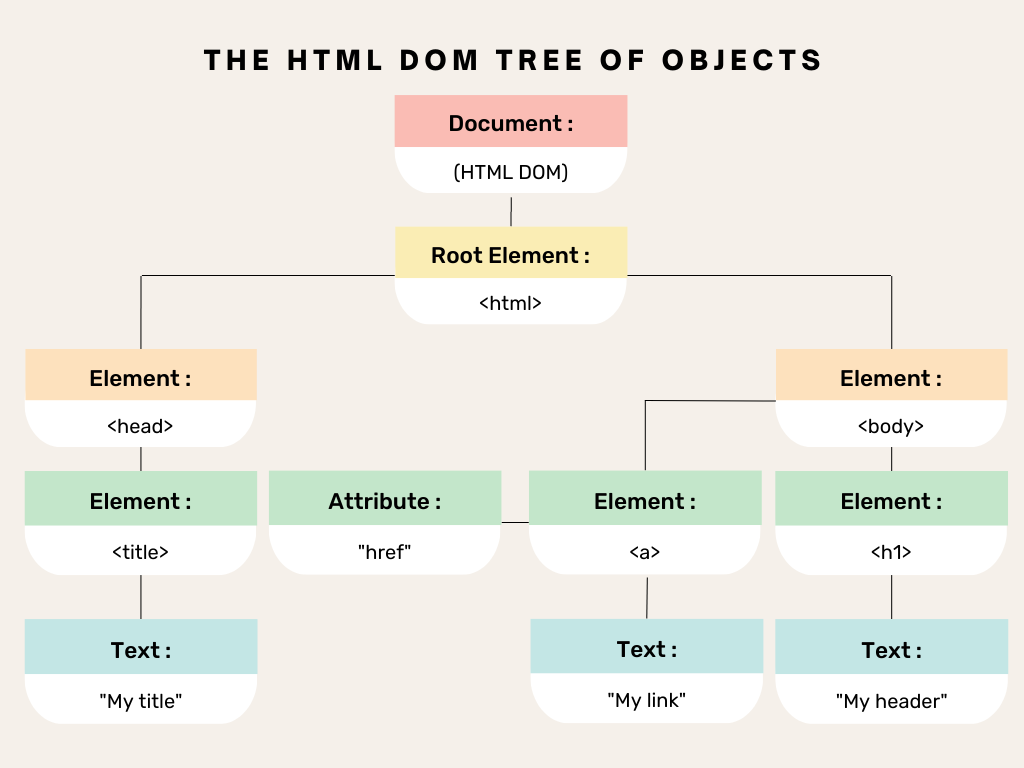
The purpose of the HTML DOM is to provide a hierarchical representation of an HTML document, where each element in the document is represented as an object with its own set of properties and methods. These objects can be manipulated using JavaScript, allowing developers to add, remove, or modify elements and their attributes, styles, and content dynamically.
The HTML DOM is used extensively in modern web development, particularly for creating dynamic and interactive web applications. It provides a powerful and flexible toolset that allows developers to create sophisticated and responsive user interfaces.
Some common uses of the HTML DOM include:
1. Manipulating HTML elements: The HTML DOM allows developers to add, remove, or modify elements and their attributes, such as text content, classes, and styles.
2. Handling events: The HTML DOM provides a way to handle user interactions, such as clicks, mouse movements, and keyboard input, by attaching event handlers to HTML elements.
3. Dynamically updating page content: The HTML DOM enables developers to dynamically update the content of a web page without having to reload the entire page. This is particularly useful for creating interactive user interfaces that respond to user actions in real-time.
4. Creating animations: The HTML DOM can be used to create animations and other visual effects by modifying the position, size, and style of HTML elements over time.
Overall, the HTML DOM is a powerful and essential tool for modern web development, providing developers with the ability to create dynamic and interactive web applications that can respond to user actions and provide a seamless user experience.
Advantages
The HTML DOM (Document Object Model) is a programming interface for web documents. It represents the web page as an object-oriented model that can be modified with scripting languages such as JavaScript. Here are some advantages of using JavaScript to manipulate the HTML DOM:
- Dynamic Web Pages: The HTML DOM provides a way to dynamically modify web pages. By using JavaScript, developers can change the content and appearance of the web page without reloading it. This allows for a more dynamic and responsive user experience.
- Interactive Web Applications: The HTML DOM allows developers to create interactive web applications. By using JavaScript, developers can create events and actions that respond to user input. This allows for a more engaging and interactive user experience.
- Cross-Browser Compatibility: The HTML DOM is supported by all modern web browsers. This means that web developers can create web applications that work consistently across different browsers and platforms.
- Accessibility: The HTML DOM provides a way to make web content more accessible to users with disabilities. By using JavaScript to modify the DOM, developers can add alternative text, keyboard navigation, and other accessibility features to web pages.
- Ease of Use: The HTML DOM is easy to use and understand. With just a few lines of JavaScript code, developers can modify the content and appearance of web pages.
- Modular Code: The HTML DOM allows developers to write modular code. By separating the presentation layer from the business logic, developers can create code that is easier to maintain and scale.
In summary, the HTML DOM provides a way to create dynamic, interactive, and accessible web pages. By using JavaScript to manipulate the DOM, developers can create web applications that work consistently across different browsers and platforms.
The 'getElementById' Method
The 'getElementById' method is a commonly used method in JavaScript's DOM programming interface. It is used to select an HTML element from the document by its ID attribute. Here is an explanation of how the 'getElementById' method works along with an example:
Syntax:
document.getElementById(id);
Parameters:
id: A string representing the ID of the element you want to retrieve.
Return value:
The HTML element with the specified ID, or null if no such element exists.
Example:
<!DOCTYPE html>
<html>
<head>
  <title>getElementById Example</title>
</head>
<body>
  <h1 id="myHeading">Hello, world!</h1>
  <script>
    // Get the element with the ID "myHeading"
    let heading = document.getElementById("myHeading");

    // Change the text of the heading element
    heading.innerText = "Hello, JavaScript!";
  </script>
</body>
</html>
In this example, we first create an HTML heading element <h1> with the ID attribute set to "myHeading". We then use the 'getElementById' method to select the heading element and store it in the 'heading' variable. Finally, we change the text of the heading element to "Hello, JavaScript!" using the 'innerText' property.
Note
The 'getElementById' method is case-sensitive, so make sure to provide the exact ID of the element you want to select. Also, if multiple elements have the same ID, only the first one will be selected
The 'innerHTML' Property
The innerHTML property is a very powerful tool that can be used to modify the contents of HTML elements. It is the easiest way to get the content of an element, and it can also be used to replace the content of an element.
The innerHTML property can be used to do a lot of things, such as:
- Get the content of an element
- Replace the content of an element
- Add new elements to the document
- Remove elements from the document
- Change the attributes of elements
Here are some examples of how to use the innerHTML property:
Getting the innerHTML
To get the innerHTML of an element, you can use the following syntax:
const element = document.getElementById("my-element");
const innerHTML = element.innerHTML;
The innerHTML property will return a string containing the HTML contents of the element, including all child elements and text nodes.
Setting the innerHTML
To set the innerHTML of an element, you can use the following syntax:
const element = document.getElementById("my-element");
element.innerHTML = "New HTML content";
This will replace the existing contents of the element with the new HTML content.
Examples
The following example shows how to use the innerHTML property to get the contents of a paragraph element and then set the contents of a heading element:
const paragraphElement = document.getElementById("my-paragraph");
const paragraphContent = paragraphElement.innerHTML;

const headingElement = document.getElementById("my-heading");
headingElement.innerHTML = paragraphContent;
The following example shows how to use the innerHTML property to create a new list element and add it to the document:
const listElement = document.createElement("ul");
listElement.innerHTML = "<li>Item 1</li><li>Item 2</li>";

document.body.appendChild(listElement);
Security concerns
The innerHTML property can be dangerous if used incorrectly. For example, if you set the innerHTML of an element to a string that contains malicious JavaScript code, the code will be executed.
Note
To avoid security risks, it is important to only set the innerHTML of elements to trusted content. You should also avoid using the innerHTML property to create elements that contain user input, such as forms and text areas.
Alternatives to innerHTML
There are a number of alternatives to the innerHTML property that can be used to modify the contents of HTML elements. These alternatives are generally safer and more efficient than using innerHTML.
Some of the most common alternatives to innerHTML include:
- The appendChild() method can be used to add new child elements to an element.
- The removeChild() method can be used to remove child elements from an element.
- The createTextNode() method can be used to create new text nodes.
- The replaceChild() method can be used to replace existing child elements with new child elements.
Finding HTML Elements
There are a number of ways to find HTML elements in JavaScript. The most common methods are document.getElementById(), document.getElementsByTagName(), and document.getElementsByClassName()
| Method |
Description |
| document.getElementById(id) |
Find an element by element id |
| document.getElementsByTagName(name) |
Find elements by tag name |
| document.getElementsByClassName(name) |
Find elements by class name |
document.getElementById()
The document.getElementById() method returns the first element in the document with the given ID. IDs are unique identifiers that you can assign to HTML elements using the id attribute.
To use document.getElementById(), simply pass the ID of the element you want to find as the argument to the method. For example, the following code will find the element with the ID myElement:
const element = document.getElementById("myElement");
document.getElementsByTagName()
The document.getElementsByTagName() method returns a collection of all elements in the document with the given tag name. Tag names are the names of the different types of HTML elements, such as div, p, and img
To use document.getElementsByTagName(), simply pass the tag name of the elements you want to find as the argument to the method. For example, the following code will find all of the elements in the document with the tag name p:
const paragraphs = document.getElementsByTagName("p");
document.getElementsByClassName()
The document.getElementsByClassName() method returns a collection of all elements in the document with the given class name. Class names are labels that you can assign to HTML elements using the class attribute.
To use document.getElementsByClassName(), simply pass the class name of the elements you want to find as the argument to the method. For example, the following code will find all of the elements in the document with the class name my-class:
const elementsWith MyClass = document.getElementsByClassName("my-class");
You can also use a combination of these methods to find more specific elements. For example, the following code will find the first element in the document with the class name my-class and the tag name p:
const paragraphWith MyClass = document.querySelector(".my-class.p");
Once you have found the element you are looking for, you can use the DOM to interact with it in a variety of ways. For example, you can change its text, attributes, or style, or you can add event handlers to it.
Changing HTML Elements
| Property |
Description |
| element.innerHTML = new html content |
Change the inner HTML of an element |
| element.attribute = new value |
Change the attribute value of an HTML element |
| element.style.property = new style |
Change the style of an HTML element |
| Method |
Description |
| element.setAttribute(attribute, value) |
Change the attribute value of an HTML element |
You can use these methods to create dynamic and interactive web pages. For example, you could use the element.textContent property to change the text of an element when the user hovers over it, or you could use the element.setAttribute() method to change the value of a form input field when the user changes the value of another form input field.
Here are some examples of how to change HTML elements using the HTML DOM Document Object:
// Change the text of the first element with the ID "myElement".
const element = document.getElementById("myElement");
element.textContent = "This is the new text for the element.";

// Change the value of the `src` attribute of the first image on the page.
const image = document.querySelector("img");
image.setAttribute("src", "new-image.png");

// Change the background color of the document body.
document.body.style.backgroundColor = "red";

// Add a new paragraph element to the document body.
const paragraph = document.createElement("p");
paragraph.textContent = "This is a new paragraph.";
document.body.appendChild(paragraph);
Automatic HTML Form Validation
Automatic HTML Form Validation
Adding and Deleting Elements
| Method |
Description |
| document.createElement(element) |
Create an HTML element |
| document.removeChild(element) |
Remove an HTML element |
| document.appendChild(element) |
Add an HTML element |
| document.replaceChild(new, old) |
Replace an HTML element |
| document.write(text) |
Write into the HTML output stream |
To add an element to the DOM, you can use the document.createElement() method to create a new element and then use the appendChild() method to append it to another element.
To delete an element from the DOM, you can use the removeChild() method to remove it from its parent element.
For example, the following code will add a new <h3> element to the body of the document:
const newHeading = document.createElement('h3');
newHeading.textContent = 'This is a new heading';
document.body.appendChild(newHeading);
The following code will delete the first p element on the page:
const firstParagraph = document.querySelector('p');
firstParagraph.parentNode.removeChild(firstParagraph);
You can use these methods to dynamically add and remove elements from your web pages, which can be useful for creating interactive and dynamic user experiences.
Adding Events Handlers
| Method |
Description |
| document.getElementById(id).onclick = function(){code} |
Adding event handler code to an onclick event |
The HTML DOM Document Object allows you to add event handlers to HTML elements. This means that you can write code to respond to user interactions, such as clicks, mouse movements, and keyboard input.
To add an event handler, you use the `addEventListener()` method. This method takes two arguments: the type of event to listen for and a function to be called when the event occurs.
For example, the following code will add a click event handler to the first `button` element on the page:
const button = document.querySelector('button');
button.addEventListener('click', () => {
  alert('You clicked the button!');
});
You can add event handlers to any HTML element, and you can add multiple event handlers to the same element.
Adding event handlers to HTML elements is a powerful way to create dynamic and interactive web pages.
Finding HTML Objects
| Property |
Description |
DOM |
| document.anchors |
Returns all <a> elements that have a name attribute |
1 |
| document.applets |
Deprecated |
1 |
| document.baseURI |
Returns the absolute base URI of the document |
3 |
| document.body |
Returns the <body> element |
1 |
| document.cookie |
Returns the document's cookie |
1 |
| document.doctype |
Returns the document's doctype |
3 |
| document.documentElement |
Returns the <html> element |
3 |
| document.documentMode |
Returns the mode used by the browser |
3 |
| document.documentURI |
Returns the URI of the document |
3 |
| document.domain |
Returns the domain name of the document server |
1 |
| document.domConfig |
Obsolete. |
3 |
| document.embeds |
Returns all <embed> elements |
3 |
| document.forms |
Returns all <form> elements |
1 |
| document.head |
Returns the <head> element |
3 |
| document.images |
Returns all <img> elements |
1 |
| document.implementation |
Returns the DOM implementation |
3 |
| document.inputEncoding |
Returns the document's encoding (character set) |
3 |
| document.lastModified |
Returns the date and time the document was updated |
3 |
| document.links |
Returns all <area> and <a> elements that have a href attribute |
1 |
| document.readyState |
Returns the (loading) status of the document |
3 |
| document.referrer |
Returns the URI of the referrer (the linking document) |
1 |
| document.scripts |
Returns all <script> elements |
3 |
| document.strictErrorChecking |
Returns if error checking is enforced |
3 |
| document.title |
Returns the <title> element |
1 |
| document.URL |
Returns the complete URL of the document |
1 |
Form Validation
Ensuring the integrity of data submitted through forms is crucial for web applications. JavaScript form validation empowers you to validate user input before it's sent to the server, preventing invalid or incomplete data from being processed.
JavaScript Form Validation:
JavaScript provides mechanisms to validate form data before submission. This validation can occur on the client-side (user's browser) using JavaScript or on the server-side using server-side languages like PHP or Python. However, client-side validation offers several advantages:
- Improved User Experience: Provides immediate feedback to users about invalid input, preventing unnecessary form submissions and frustration.
- Reduced Server Load: Prevents invalid data from reaching the server, improving server efficiency.
JavaScript Can Validate Numeric Input:
Here's an example of validating a form field to ensure it contains only numeric characters:
<form id="myForm">
  <label for="age">Enter your age:</label>
  <input type="text" id="age" name="age">
  <button type="submit">Submit</button>
</form>

<script>
  document.getElementById("myForm").addEventListener("submit", function(event) {
    let ageInput = document.getElementById("age");
    let age = ageInput.value;

    // Check if input is a valid number
    if (isNaN(age)) {
      alert("Please enter a valid number for your age.");
      event.preventDefault(); // Prevent form submission
    }
  });
</script>
Automatic HTML Form Validation:
HTML5 offers built-in validation attributes for common input types:
-
required: Ensures a field is not left empty.
pattern: Validates input against a regular expression pattern (e.g., email format).min: Specifies a minimum value for numeric input.max: Specifies a maximum value for numeric input.
These attributes offer basic validation, but JavaScript allows for more complex validation rules and dynamic error messages.
JavaScript form validation empowers you to build robust and user-friendly web forms, enhancing the overall quality of your web applications. Don't underestimate the power of client-side validation for a smoother user experience and reduced server load.
Data Validation
Data validation is the process of ensuring that user input is clean, correct, and useful.
Typical validation tasks are:
has the user filled in all required fields?
has the user entered a valid date?
has the user entered text in a numeric field?
Most often, the purpose of data validation is to ensure correct user input.
Validation can be defined by many different methods, and deployed in many different ways.
Server side validation is performed by a web server, after input has been sent to the server.
Client side validation is performed by a web browser, before input is sent to a web server.
HTML Constraint Validation
HTML offers built-in mechanisms for validating user input within forms, preventing invalid data submission. This documentation explores these validation techniques and styling options.
Constraint Validation HTML Input Attributes:
The following HTML attributes empower you to specify validation constraints for various input types:
| Attribute |
Description |
required |
Makes the input field mandatory. The user must enter a value before submitting the form. |
minlength |
Sets the minimum number of characters allowed for the input value. |
maxlength |
Sets the maximum number of characters allowed for the input value. |
min |
Sets the minimum value (numeric input) the user can enter. |
max |
Sets the maximum value (numeric input) the user can enter. |
pattern |
Defines a regular expression pattern that the input value must match. |
type (various) |
Specifies the expected input type (e.g., email for email addresses, url for URLs) and often triggers browser-specific validation (e.g., email format check). |
Example:
<form>
      <label for="name">Name:</label>
      <input type="text" id="name" name="name" required minlength="3">  <br>
      <label for="email">Email:</label>
      <input type="email" id="email" name="email" required pattern="[a-z0-9._%+-]+@[a-z0-9.-]+\.[a-z]{2,}$">  <br>
      <button type="submit">Submit</button>
  </form>
Constraint Validation CSS Pseudo Selectors:
CSS pseudo selectors provide a way to style form elements based on their validity state, offering visual feedback to users:
| Selector |
Description |
:valid |
Matches form elements (including the entire form) that have passed all validation constraints. |
:invalid |
Matches form elements (including the entire form) that have failed one or more validation constraints. |
Example:
input:valid {
      border-color: green;
  }

  input:invalid {
      border-color: red;
  }

  form:valid {
      background-color: lightgreen;
  }

  form:invalid {
      background-color: lightcoral;
  }
By combining HTML constraint validation with CSS styling, you create a user-friendly experience that guides users towards providing correct information. Users receive instant feedback on the validity of their input, improving data accuracy within your web forms.
Changing HTML Style
HTML provides a foundation for web page structure, but styling brings elements to life with visual appeal. This documentation delves into the basics of changing HTML element styles using inline and external stylesheets.
Changing HTML Style:
There are two primary methods for modifying the appearance of HTML elements:
Inline Styles:
- Inline styles are defined directly within the HTML element using the
style attribute.
- This approach offers quick styling for individual elements but can lead to cluttered and less maintainable code for complex web pages.
<h1 style="color: blue; font-size: 2em;">This is a heading</h1>
External Stylesheets:
- External stylesheets promote better organization and reusability.
- Styles are defined within a separate CSS (.css) file, linked to the HTML document using the
<link> tag in the <head> section.
HTML (index.html):
<link rel="stylesheet" href="styles.css">
CSS (styles.css):
h1 {
      color: blue;
      font-size: 2em;
  }
In the CSS example, the h1 selector targets all <h1> elements on the page, applying the specified styles (blue color and 2em font size).
Choosing the Right Approach:
- Use inline styles sparingly, for minor adjustments or testing purposes.
- For complex styling or reusable styles across multiple elements, external stylesheets are the preferred approach.
- External stylesheets offer better separation of concerns, making your HTML code cleaner and easier to maintain.
- By mastering element selection and CSS properties, you unlock the power to create visually appealing and user-friendly web pages.
Changing Style Using Events
JavaScript empowers you to create dynamic and interactive web pages. One powerful technique involves modifying element styles based on user actions or events. This documentation explores how to achieve this using JavaScript event listeners and style manipulation methods.
Changing Style Using Events:
<button id="myButton">Click Me!</button>
<script>
  let button = document.getElementById("myButton");
  button.addEventListener("click", function() {
    // Change button background color to red on click
    button.style.backgroundColor = "red";
  });
</script>
In this example, clicking the button triggers the event listener function. The function changes the button's background color to red using the style.backgroundColor property.
Beyond the Basics:
This is just a starting point. You can leverage various events and style properties to create dynamic and engaging user experiences. Experiment with different events (hover, submit, etc.) and style modifications (font size, opacity, etc.) to craft interactive web pages that respond to user interaction.
Full Animation Using JavaScript
JavaScript empowers you to create dynamic and engaging web experiences through animations. This guide walks you through the essential steps to build a basic animation using JavaScript.
- A Basic Web Page:
Start by creating a simple HTML document with a container element (div) for your animation. Include JavaScript within a <script> tag or link to an external JavaScript file.
<!DOCTYPE html>
<html lang="en">
<head>
    <meta charset="UTF-8">
    <meta name="viewport" content="width=device-width, initial-scale=1.0">
    <title>Animated Box</title>
    <link rel="stylesheet" href="styles.css">  </head>
<body>
    <div id="animation-container"></div>
    <script src="animation.js"></script>  </body>
</html>
Create an Animation Container:
Define the animation container's style (dimensions, background color, etc.) using CSS. This element will house the animated content.
styles.css:
#animation-container {
    width: 100px;
    height: 100px;
    background-color: red;
    margin: 50px auto;  }
Style the Elements (Optional):
You can further style the animated element within the container using inline styles or CSS classes.
index.html:
<div id="animation-container">
    <span style="color: white;">This text will be animated!</span>
</div>
Animation Code:
In your JavaScript file, utilize the requestAnimationFrame function to create smooth animations. This function repeatedly calls your animation logic, allowing for incremental updates to the element's style properties.
animation.js:
let animationContainer = document.getElementById("animation-container");
let currentX = 0;  // Starting position for animation

function animate() {
  currentX += 5;  // Update position by 5 pixels each frame
  animationContainer.style.transform = `translateX(${currentX}px)`;  // Apply transformation
  requestAnimationFrame(animate);  // Schedule the next animation frame
}

animate();  // Start the animation
This is a basic example. You can explore various animation properties like translateY, rotate, and opacity to create more complex movements. Remember, effective animation design principles are crucial for creating a visually appealing and user-friendly experience.
HTML Event Attributes
JavaScript shines in its ability to respond to user interactions with web pages. This documentation explores HTML event attributes and how to leverage them with JavaScript to create dynamic and engaging web experiences.
Reacting to Events:
Web pages are static by nature. HTML event attributes bridge the gap, allowing you to define actions that occur in response to user interactions (clicks, mouseovers, form submissions, etc.).
HTML Event Attributes:
Various HTML elements support event attributes like onclick, onmouseover, onsubmit, and more. These attributes specify the JavaScript function to be executed when the corresponding event occurs on the element.
Assigning Events Using the HTML DOM:
While event attributes can be directly assigned within HTML, JavaScript offers more flexibility. You can dynamically attach event listeners using the Document Object Model (DOM):
let button = document.getElementById("myButton");
button.addEventListener("click", function() {
alert("Button clicked!");
});
In this example, the addEventListener method attaches a click event listener to the button element. When the button is clicked, the specified function is triggered, displaying an alert message.
Common Event Examples:
Here's a breakdown of some frequently used event attributes:
onload and onunload: Trigger JavaScript code when the page finishes loading (onload) or is about to unload (onunload).
<body onload="welcomeUser()">
...
</body>
onchange: Execute a function when the value of a form element (e.g., text input, select box) changes.
<input type="text" id="username" onchange="validateUsername()">
onmouseover and onmouseout: Respond to mouse hovering over (onmouseover) or leaving (onmouseout) an element.
<p id="info" onmouseover="showInfo()" onmouseout="hideInfo()">More information...</p>
onmousedown, onmouseup, and onclick: Capture mouse button events (down, up, and click) on an element.
<button id="submitButton" onmousedown="disableButton()" onclick="submitForm()">Submit</button>
These are just a few examples. Explore the vast array of HTML event attributes and leverage JavaScript's power to create interactive and responsive web pages that react to user actions in meaningful ways.
The addEventListener() method
The addEventListener() method is a cornerstone of dynamic web development in JavaScript. It allows you to attach event listeners to HTML elements, enabling your web pages to respond to user interactions and other events.
The addEventListener() Method:
This method has the following syntax:
element.addEventListener(event, handler, useCapture);
element: The target HTML element to which you want to listen for events.event: The specific event type (e.g., "click", "mouseover", "keydown", etc.).handler: A function that will be executed when the specified event occurs.useCapture (optional): A Boolean value indicating the event propagation phase (defaults to false for bubbling, true for capturing).
Adding an Event Handler to an Element:
Here's an example that adds a click event listener to a button:
let button = document.getElementById("myButton");
button.addEventListener("click", function() {
  console.log("Button clicked!");
});
In this example, when the button is clicked (the "click" event), the provided function is executed, logging a message to the console.
Passing Parameters:
The event handler function can receive an event object as a parameter, which contains information about the event that occurred. This object provides details like the event type, target element, and mouse coordinates (for mouse events).
button.addEventListener("click", function(event) {
  console.log("Target:", event.target); // The button element
  console.log("Event type:", event.type);  // "click"
});
Event Bubbling or Event Capturing?
By default, events in JavaScript follow a bubbling propagation model. When an event occurs on an element, it first triggers on that element, then bubbles up to its parent elements, and so on, until it reaches the document object.
The optional useCapture parameter in addEventListener() allows you to specify the event propagation phase:
-
useCapture = false (default): Bubbling behavior (event fires on the target element first, then bubbles up)
-
useCapture = true: Capturing behavior (event fires on the deepest nested element first, then propagates up)
Capturing is less commonly used, but it can be useful in specific scenarios where you need to handle events on a parent element before they reach its children.
By understanding the addEventListener() method and event propagation, you can create interactive and responsive web experiences in JavaScript.
The removeEventListener() method
Event listeners are essential for creating interactive web pages. They allow JavaScript code to react to user actions or browser events (e.g., clicks, key presses, page loads). However, it's equally important to remove event listeners when they're no longer needed to prevent memory leaks and unexpected behavior. This documentation explains the `removeEventListener()` method for managing event listeners effectively.
The removeEventListener() Method:
The removeEventListener() method detaches a previously attached event listener from a target element. It takes three arguments:
eventTarget (required): The element from which to remove the event listener.event (required): The event type (e.g., "click", "mouseover").eventListener (required): The specific function reference that was originally assigned as the event handler.
Example:
// Button element
let button = document.getElementById("myButton");

// Function to handle button clicks
function handleClick() {
  console.log("Button clicked!");
}

// Add event listener to the button
button.addEventListener("click", handleClick);

// Later in your code, remove the event listener when it's no longer needed
button.removeEventListener("click", handleClick);
In this example, the handleClick function is attached as an event listener for the "click" event on the button element. Later, the removeEventListener method detaches the same function, preventing further execution of handleClick when the button is clicked.
Key Points:
- Ensure you use the exact same function reference (
handleClick in this case) for removal as the one used for adding the event listener.
- Removing event listeners is crucial for memory management and preventing unintended behavior when event handlers are no longer necessary.
By effectively using removeEventListener(), you can maintain clean and efficient event handling in your JavaScript applications.
DOM Nodes
The Document Object Model (DOM) represents the structure of an HTML document as a tree of nodes. JavaScript provides access to these nodes through various methods, and Node Lists play a crucial role in navigating and manipulating the DOM.
The HTML DOM NodeList Object:
A NodeList is a collection of DOM nodes, similar to an array. It's returned by certain methods that interact with the DOM structure, allowing you to access and interact with multiple nodes at once. Here are some common methods that return Node Lists:
-
document.querySelectorAll(selector): Selects all elements matching a specific CSS selector.
-
parentNode.childNodes: Returns a NodeList containing all child nodes of a specific parent element.
-
parentElement.children: Returns a collection of the element's direct child elements (excluding text nodes).
HTML DOM Node List Length:
The length property of a NodeList indicates the number of nodes it contains. You can use this property to iterate through the NodeList elements:
let elements = document.querySelectorAll("h1");
for (let i = 0; i < elements.length; i++) {
  console.log(elements[i].textContent); // Access each element's text content
}
The Difference Between an HTMLCollection and a NodeList:
While both resemble arrays, there are key distinctions between HTMLCollection and NodeList:
- Type:
NodeList is a generic DOM interface, representing any collection of nodes. An HTMLCollection is a more specific type, containing only HTML element nodes.
- Live vs. Static:
NodeList is generally "live," meaning changes to the DOM are reflected in the NodeList. HTMLCollection might be "live" or "static" depending on the method that creates it.
Understanding Node Lists empowers you to effectively manipulate the DOM structure in your JavaScript code. By iterating through Node Lists, you can access and modify elements, attributes, and content within your web pages. Remember, Node Lists provide a powerful tool for dynamic web development.